TDD and Refactoring Help

Outside-In TDD

  • Outside-In TDD

    • 0. 전체적인 진행 방향

    • 1. Outside-In TDD

      • 1.1 감 잡아보기

      • 1.2 모듈의 엔드포인트에 대한 E2E 테스트 작성(AuthControllerTest)

        • 1.2.1 테스트 리스트 작성

        • 1.2.2 add test - AuthControllerTest#signIn_successfully

        • 1.2.3 add test - AuthControllerTest#signIn_failed

        • 1.2.4 refactor test to remove dup.

        • 1.2.5 add failing test AuthControllerTest#attempt_login

      • 1.3 LoginAttemptService 구현

        • 1.3.1 테스트 리스트 작성

        • 1.3.2 add test - LoginAttemptServiceTest#attempt_login_success

        • 1.3.3 add test - LoginAttemptServiceTest#attempt_login_failed

        • 1.3.4 add test - LoginAttemptServiceTest#attempt_login_failed_and_exceeds_try_count

        • 1.3.5 add test - LoginAttemptServiceTest#attempt_login_failed_4_times_and_succeeded_and_failed_4_times

        • 1.3.6 테스트 격리를 위한 조치

        • 1.3.7 Extract Approval Test Printer

    • 2. Inside out with Fake(memeory impl)

      • 2.1 AuthControllerTest가 Fake로 동작하도록 수정

      • 2.2 Implement Real Adapter

        • 2.2.1 JPA Mapping

        • 2.2.2 Implement Adapter

        • 2.2.3 Test Isolation with

      • 2.3 Adapter로 테스트 성공시키기

    • 맺음말

구현할 기능: 연속 비번 오류 시 계정 비활성화

  • 로그인 시 로그인 시도 결과를 기록하고, 5번 연속으로 로그인 실패했을 때 사용자 정보를 비활성 처리하여 사용 불가하도록 한다.

0. 전체적인 진행 방향

  • outside-in TDD로 엔드포인트(Controller)에 대한 E2E 테스트로 시작해서 내부(application, domain)로 들어가면서 필요한 인터페이스를 반복/점진적으로 찾아가면서 Mock을 적용해서 테스트를 동작시키고

  • 필요한 인터페이스를 다 찾은 후에는 빠른 개발을 위해 Fake (In Memory Adapter)를 구현하고

  • 외부로 나오면서 Mock을 Fake로 치환하면서 테스트가 동작하도록 함

  • 모든 기능이 동작하면 Fake를 실제 DB를 사용하는 Adapter로 치환했을 때 부드럽게 동작해야 함

  • 핵심

    • JPA Entity 등을 다루기 위해 다양한 Interface를 만들어서 application, domain의 의존성을 복잡하게 하지 말고

    • Facade(Port Interface)를 하나의 주요한 행위에 대해서 발견, 정의, 사용한다.

      • Facade의 구현체(Adapter)는 다양한 jpa repository, dao 등을 사용할 수 있다.

    • JPA Repository는 Java Interface이지만 실제로는 구현체임

    • Facade에 대한 구현을 Map 등을 이용하여 구현하여 모든 기능이 동작함으로 테스트를 통해 확인하고

    • 마지막 JPA Mapping 등을 통해 Real Implementation을 제공하면 기존의 모든 테스트가 거의 변경 없이 부드럽게 동작하는 것을 경험하게 됨

1. Outside-In TDD

1.1 감 잡아보기(#11-감-잡아보기)

  • green field의 경우 테스트에 모든 기능을 구현하고 extract method/delegate 등의 리팩터링을 진행하는 방식이 자연스러움

    • split by abstraction layer

    • split by unrelated complexity

    • 등을 이용해서 SoC

  • 그런데 기존 코드(이번의 걍우 AuthController)가 있는 경우에는 테스트에서 바로 시작하기 보다는

    • seam(이음새)을 발견하여 여기에 새로운 기능을 구현하는 방식이 보다 자연스러움

    • 아무것도 없는 것에 새로운 기능을 구현하는 것이 아님

    • 기존 코드에 로직을 추가해야 하고, 다른 서비스에서 호출할 수도 있어야 함

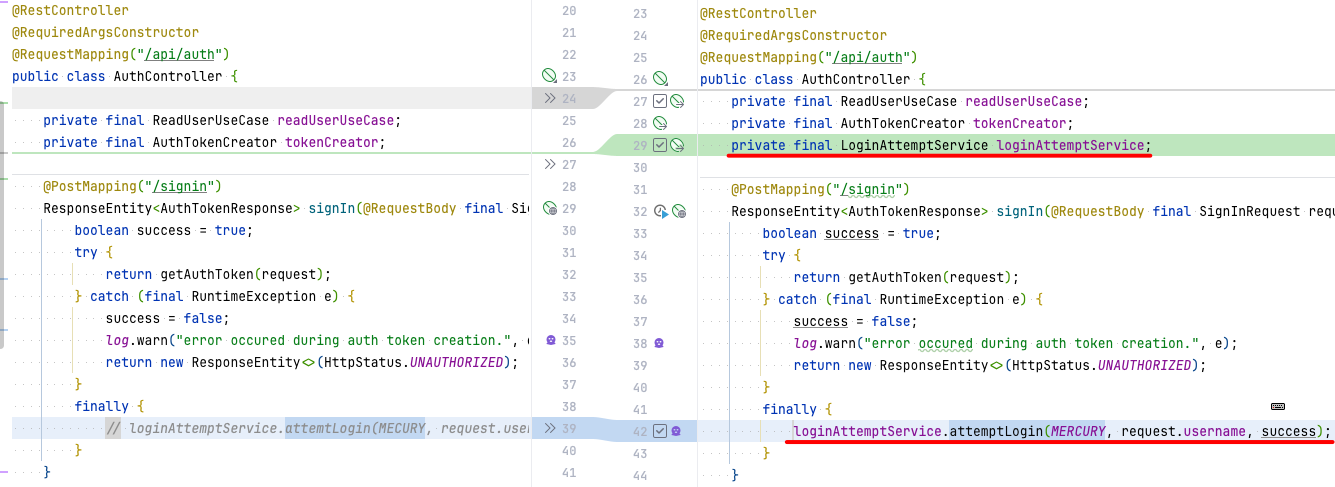
@PostMapping("/signin") ResponseEntity<AuthTokenResponse> signIn(@RequestBody final SignInRequest request) { boolean success = true; try { return getAuthToken(request); } catch (final RuntimeException e) { success = false; log.warn("error occured during auth token creation.", e); return new ResponseEntity<>(HttpStatus.UNAUTHORIZED); } finally { // loginAttemptService.attemptLogin(MECURY, request.username, success); } } // @PostMapping("/attempt-login") // ResponseEntity<String> attemptLogin(@RequestBody final AttemptLoginRequest request) { // loginAttemptService.attemptLogin(BO, request.userId(), success); // return new ResponseEntity<>(HttpStatus.OK); // }
attempt_login_6.png
  • 위와 같이 기존 코드에 완성된 모습을 생각해서 코스를 추가해서 어떤 느낌인지를 본다

    • 신규 소비자라면 테스트 코드에서 호출을 해 보며 확인이 가능하나

    • 이미 기존 소비자가 존재하는 경우 이와 같은 방법이 머릿속에 더 잘 들어온다

    • 그리고는 추가한 코드를 커멘트 처리한다.

loginAttemptService.attemptLogin(MECURY, request.username, success);
  • 이게 우리에게 필요한 인터페이스임

1.2 모듈의 엔드포인트에 대한 E2E 테스트 작성(AuthControllerTest)

  • class의 public method를 추가할 때마다 테스트를 추가하는 것이 아님

    • 이러한 개발의 편의를 위해 추가하는 테스트는 단위 테스트라기 보다 Developer Test, Programmer Test가 더 적합한 이름임(TDD Revisited - Ian Cooper - NDC Porto 2023)

    • developer test는 구현 후에 의미가 없어지면 삭제할 수도 있음

    • 이런 테스트들은 구현에 커플링되어 리팩터링 등으로 행위 변경 없이 구조만 변경되더라도 깨지는 경우가 빈번하게 발생함

1.2.1 테스트 리스트 작성

  • TDD를 시작할 때 가장 먼저 해야 할 일은 구현해야 할 기능에 대한 요구사항을 분석하고, 이를 테스트 리스트로 작성하는 것이다.

/** * id, pwd가 일치하면 성공 로그를 쌓는다 * id, pwd가 일치하지 않으면 실패 로그를 쌓는다 * 로그인 시도를 요청하면 관련 로그를 쌓는다 */ @SpringBootTest class AuthControllerTest { }

1.2.2 add test - AuthControllerTest#signIn_successfully

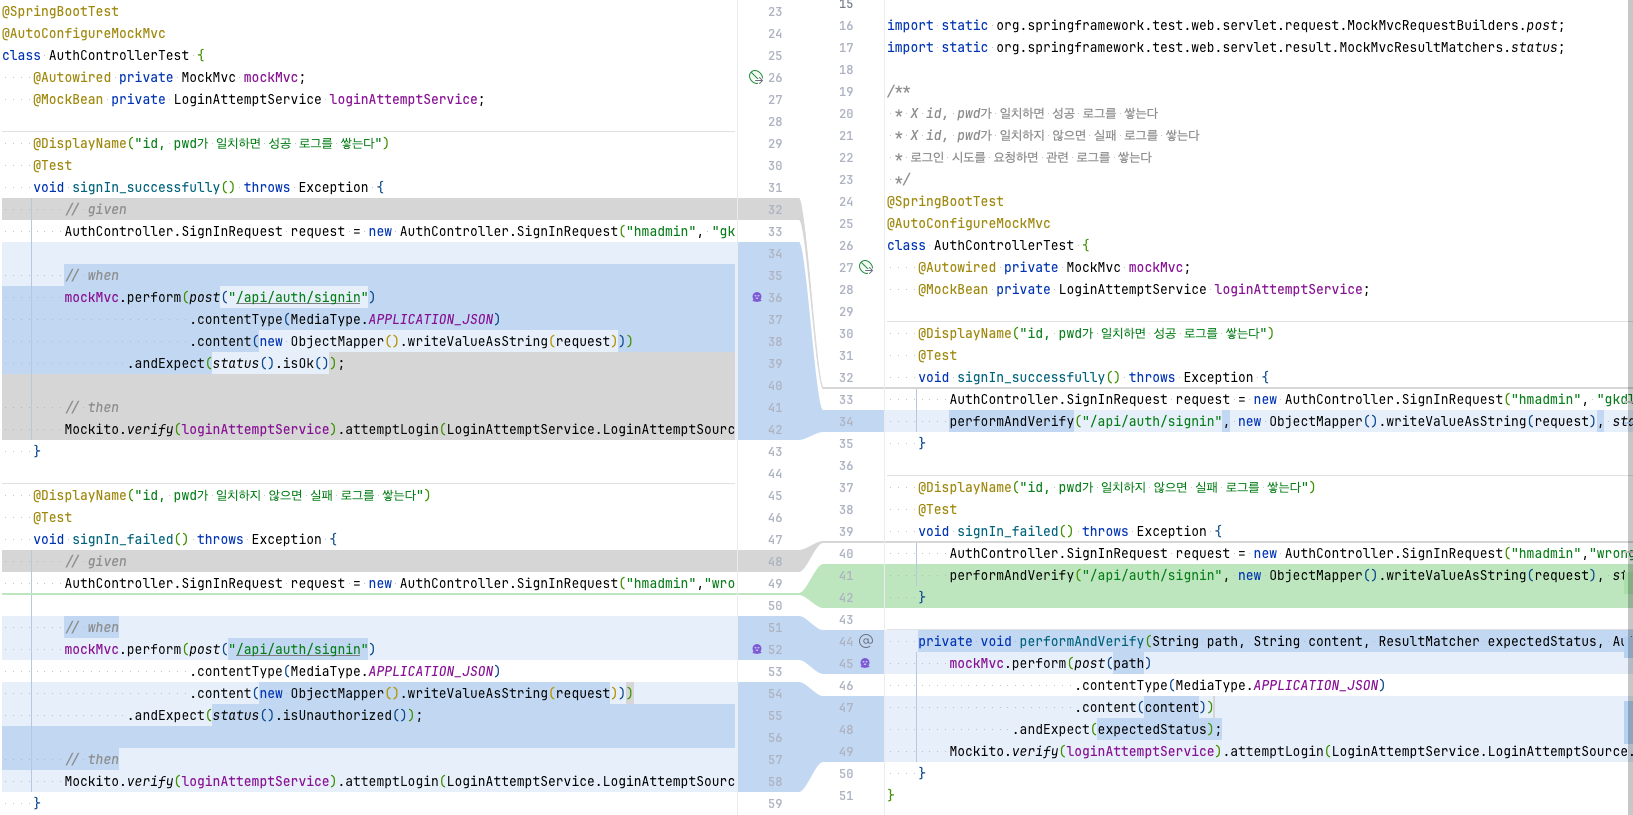
@SpringBootTest @AutoConfigureMockMvc class AuthControllerTest { @Autowired private MockMvc mockMvc; @MockBean private LoginAttemptService loginAttemptService; @DisplayName("id, pwd가 일치하면 성공 로그를 쌓는다") @Test void signIn_successfully() throws Exception { // given AuthController.SignInRequest request = new AuthController.SignInRequest("admin", "pwd"); // when mockMvc.perform(post("/api/auth/signin") .contentType(MediaType.APPLICATION_JSON) .content(new ObjectMapper().writeValueAsString(request))) .andExpect(status().isOk()); // then Mockito.verify(loginAttemptService).attemptLogin(LoginAttemptService.LoginAttemptSource.MERCURY, request.username(), true); } }
  • 1.1 감 잡아보기 를 떠올리며 새롭게 추가할 LoginAttempService를 호출하는 것을 기대하는 테스트 작성

  • make it work

    image_2.png
    • 테스트가 성공하면 테스트 클래스 상단에 있는 테스트 목록에 완료 표시를 함

    img_2.png

1.2.3 add test - AuthControllerTest#signIn_failed

@DisplayName("id, pwd가 일치하지 않으면 실패 로그를 쌓는다") @Test void signIn_failed() throws Exception { // given AuthController.SignInRequest request = new AuthController.SignInRequest("admin", "wrong_pwd"); // when mockMvc.perform(post("/api/auth/signin") .contentType(MediaType.APPLICATION_JSON) .content(new ObjectMapper().writeValueAsString(request))) .andExpect(status().isUnauthorized()); // then Mockito.verify(loginAttemptService).attemptLogin(LoginAttemptService.LoginAttemptSource.MERCURY, request.username(), false); }

1.2.4 refactor test to remove dup.

image_2.png

1.2.5 add failing test AuthControllerTest#attempt_login

@DisplayName("로그인 시도를 요청하면 관련 로그를 쌓는다") @Test void attempt_login() throws Exception { AuthController.AttemptLoginRequest request = new AuthController.AttemptLoginRequest("admin",true); performAndVerify("/api/auth/attempt-login", objectMapper.writeValueAsString(request), status().isOk(), true, request.userId()); }
  • make AuthControllerTest#attempt_login work

    • 커멘트 처리했던 코드를 구현

      attempt_login_5.png

1.3 LoginAttemptService 구현

1.3.1 테스트 리스트 작성

/** * 로그인이 성공하면 성공 로그를 쌓는다 * 로그인이 실패하고, 로그인 시도 횟수를 초과하지 않으면 실패 로그를 쌓는다 * 로그인이 실패하고, 로그인 시도 횟수를 초과하면 실패 로그를 쌓고, 사용자의 상태를 비활성으로 변경한다. * 4번 실패, 1번 성공, 4번 실패하면 로그를 쌓고, 사용자의 상태를 비활성으로 변경하지 않는다 */ class LoginAttemptServiceTest { }

1.3.2 add test - LoginAttemptServiceTest#attempt_login_success

  • LoginAttemptServiceTest

class LoginAttemptServiceTest { private LoginAttemptService loginAttemptService; private LoginAttemptPort loginAttemptPort; @BeforeEach void setUp() { loginAttemptPort = new LoginAttemptMemoryImpl(); loginAttemptService = new LoginAttemptService(loginAttemptPort); } @DisplayName("로그인이 성공하면 성공 로그를 쌓는다") @Test void attempt_login_success() { // given String username = "admin"; boolean success = true; // when loginAttemptService.attemptLogin(MERCURY, username, success); // then User user = loginAttemptPort.findUserByUserId(username); String userLine = String.format("username: %s, activated: %s", user.getName(), user.isActivated()); Collection<AdminUserLoginAttempt> attempts = loginAttemptPort.listByUserId(username); String attemptLines = attempts.stream() .map(a -> String.format("source: %s, username: %s, success: %s", a.getSource(), a.getUserId(), a.getSuccess())) .reduce(userLine, (a, b) -> a + "\n" + b); Approvals.verify(attemptLines); } }
  • Printer, ApprovalsTest 를 이용해서 테스트 결과를 확인

  • 이 테스트를 통해서 Port Interface(LoginAttemptPort )가 점진적으로 발견됨

public interface LoginAttemptPort { AdminUserLoginAttempt save(AdminUserLoginAttempt attempt); User findUserByUserId(String userId); Collection<AdminUserLoginAttempt> listByUserId(String userId); }
  • make LoginAttemptServiceTest#attempt_login_success work

    • LoginAttemptMemoryImpl

public class LoginAttemptMemoryImpl implements LoginAttemptPort { private AtomicLong attemptsId = new AtomicLong(0); private Map<Long, AdminUserLoginAttempt> attempts = new HashMap<>(); private User user = User.admin(); @Override public AdminUserLoginAttempt save(AdminUserLoginAttempt attempt) { attempt.assignId(attemptsId.incrementAndGet()); attempts.put(attempt.getId(), attempt); return attempt; } @Override public User findUserByUserId(String userId) { return user; } @Override public Collection<AdminUserLoginAttempt> listByUserId(String userId) { return attempts.values().stream() .filter(a -> a.getUserId().equals(userId)) .sorted((a, b) -> b.getTimestamp().compareTo(a.getTimestamp())) .toList(); } }
  • AtomicLong을 이용해서 id를 생성하고, Map을 이용해서 저장하고 조회하는 기능으로 Repository를 대체하는 Fake를 구현하는 것은 많이 사용하는 패턴임

image_2.png

1.3.3 add test - LoginAttemptServiceTest#attempt_login_failed

@DisplayName("로그인이 실패하고, 로그인 시도 횟수를 초과하지 않으면 실패 로그를 쌓는다") @Test void attempt_login_failed() { // given String username = "admin"; boolean success = false; // when IntStream.range(0, 4).forEach(i -> loginAttemptService.attemptLogin(MERCURY, username, success)); // then User user = loginAttemptPort.findUserByUserId(username); String userLine = String.format("username: %s, activated: %s", user.getName(), user.isActivated()); Collection<AdminUserLoginAttempt> attempts = loginAttemptPort.listByUserId(username); String attemptLines = attempts.stream() .map(a -> String.format("source: %s, username: %s, success: %s", a.getSource(), a.getUserId(), a.getSuccess())) .reduce(userLine, (a, b) -> a + "\n" + b); Approvals.verify(attemptLines); }
  • LoginAttemptServiceTest#attempt_login_sucess를 복사해서 실패하는 경우 테스트를 작성

  • 리팩터링: 중복 검증 코드 추출

    image_3.png

1.3.4 add test - LoginAttemptServiceTest#attempt_login_failed_and_exceeds_try_count

@DisplayName("로그인이 실패하고, 로그인 시도 횟수를 초과하면 실패 로그를 쌓고, 사용자의 상태를 비활성으로 변경한다") @Test void attempt_login_failed_and_exceeds_try_count() { IntStream.range(0, 5).forEach(i -> loginAttemptService.attemptLogin(MERCURY, username, false)); verify(username); }
  • make LoginAttemptServiceTest#attempt_login_failed_and_exceeds_try_count pass

image_4.png
  • 구현을 진행하면 Port에 필요한 메소드를 계속해서 추가

    • Port의 구현에 대해서 신경쓰지 말고

    • 필요한 인터페이스만 발견/추가하(Iteratively, Incrementally Interface Discovery가 TDD의 과정임)

1.3.5 add test - LoginAttemptServiceTest#attempt_login_failed_4_times_and_succeeded_and_failed_4_times

@DisplayName("4번 실패, 1번 성공, 4번 실패하면 로그를 쌓고, 사용자의 상태를 비활성으로 변경하지 않는다") @Test void attempt_login_failed_4_times_and_succeeded_and_failed_4_times() { IntStream.range(0, 4).forEach(i -> loginAttemptService.attemptLogin(MERCURY, username, false)); loginAttemptService.attemptLogin(MERCURY, username, true); IntStream.range(0, 4).forEach(i -> loginAttemptService.attemptLogin(MERCURY, username, false)); verify(username); }
  • make LoginAttemptServiceTest#attempt_login_failed_4_times_and_succeeded_and_failed_4_times work

image_5.png

1.3.6 테스트 격리를 위한 조치

  • Port에 대한 구현을 메모리를 사용하는 Fake로 구현했다.

  • 테스트 클래스에서 사용하는 Fake가 테스트 메소드가 차례로 수행될 때 Fake의 메모리에 계속 작업 내역이 누적되어 테스트가 깨진다.

  • 다음과 같아 테스트 격리를 위해 초기화를 추가한다.

  • LoginAttemptServiceTest

    image_6.png

  • LoginAttemptService

    image_7.png

1.3.7 Extract Approval Test Printer

  • test printer를 AuthControllerTest에서도 사용하기 위해 별도의 클래스로 추출

public class LoginAttemptPrinter { private final LoginAttemptPort loginAttemptPort; public LoginAttemptPrinter(LoginAttemptPort loginAttemptPort) { this.loginAttemptPort = loginAttemptPort; } String print(String username) { User user = loginAttemptPort.findUserByUserId(username); String userLine = String.format("username: %s, activated: %s", user.getName(), user.isActivated()); Collection<AdminUserLoginAttempt> attempts = loginAttemptPort.listByUserId(username); String attemptLines = attempts.stream() .map(a -> String.format("source: %s, username: %s, success: %s", a.getSource(), a.getUserId(), a.getSuccess())) .reduce(userLine, (a, b) -> a + "\n" + b); return attemptLines; } }

2. Inside out with Fake(memeory impl)

  • 지금까지 Outside에서 Inside로 들어오면서 필요한 협력 객체와 인터페이스를 점진적으로 모두 발견했고,

public interface LoginAttemptPort { AdminUserLoginAttempt save(AdminUserLoginAttempt attempt); User findUserByUserId(String userId); Collection<AdminUserLoginAttempt> listByUserId(String userId); User saveUser(User user); }
  • 테스트를 성공시키기 위해 Adapter의 Memory Impl을 구현했다.

public class LoginAttemptMemoryImpl implements LoginAttemptPort { private AtomicLong attemptsId = new AtomicLong(0); private Map<Long, AdminUserLoginAttempt> attempts = new HashMap<>(); private User user = User.admin(); public void init() { attemptsId = new AtomicLong(0); attempts = new HashMap<>(); user = User.admin(); } @Override public AdminUserLoginAttempt save(AdminUserLoginAttempt attempt) { attempt.assignId(attemptsId.incrementAndGet()); attempts.put(attempt.getId(), attempt); return attempt; } @Override public User findUserByUserId(String userId) { return user; } @Override public Collection<AdminUserLoginAttempt> listByUserId(String userId) { return attempts.values().stream() .filter(a -> a.getUserId().equals(userId)) .sorted((a, b) -> b.getTimestamp().compareTo(a.getTimestamp())) .limit(5) .toList(); } @Override public User saveUser(User user) { this.user = user; return user; } }
  • 이제부터는 밖으로 나가면서 Mock을 Fake(Adapter의 In Memory 구현체 - LoginAttemptMemoryImpl)로 치환하고 동작하도록 한다.

2.1 AuthControllerTest가 Fake로 동작하도록 수정

image_8.png
  • TestConfig를 사용하는 이유는 LoginAttemptPort에 대한 구현체가 2개여서 의존성 주입 오류가 발생하는 것을 방지하기 위함임

image_9.png

2.2 Implement Real Adapter

  • 이제는 DB를 사용하는 실제 Port 구현체(Adapter)만 남았음

  • 여기서는 JPA를 이용해서 구현한다

  • 이렇게 구현한 후 Fake를 실제 구현체로 변경했을 때 기존의 모든 코드가 부드럽게 동작하는 것을 경험하게 됨(나는 이 부분이 가장 좋았다)

2.2.1 JPA Mapping

@Getter @Setter(AccessLevel.PACKAGE) @Entity @Table(name = "ADMIN_USER_LOGIN_ATTEMPT") public class AdminUserLoginAttempt { @Id @GeneratedValue(strategy = IDENTITY) private Long id; @Column(name = "USER_ID") private String userId; @Column(name = "SOURCE") private LoginAttemptSource source; @Convert(converter = BooleanToYNConverter.class) @Column(name = "SUCCESS_YN", length = 1) private Boolean success; @Column(name = "REG_DT") private Timestamp timestamp; public AdminUserLoginAttempt(LoginAttemptSource source, String userId, boolean success) { this(); this.source = source; this.userId = userId; this.success = success; } public AdminUserLoginAttempt() { this.timestamp = new Timestamp(System.currentTimeMillis()); } public void assignId(Long id) { this.id = id; } }

2.2.2 Implement Adapter

@Component @RequiredArgsConstructor public class LoginAttemptAdapter implements LoginAttemptPort { private final AdminUserLoginAttemptRepository adminUserLoginAttemptRepository; private final UserRepository userRepository; private int limit = 5; @Override public AdminUserLoginAttempt save(AdminUserLoginAttempt attempt) { return adminUserLoginAttemptRepository.save(attempt); } @Override public User findUserByUserId(String userId) { return userRepository.findByName(userId); } @Override public Collection<AdminUserLoginAttempt> listByUserId(String userId) { return adminUserLoginAttemptRepository.findByUserIdOrderByIdDesc(userId, limit); } @Override public User saveUser(User user) { return userRepository.save(user); } }
public interface AdminUserLoginAttemptRepository extends JpaRepository<AdminUserLoginAttempt, Long> { @Query("select a from AdminUserLoginAttempt a where a.userId = :userId order by a.id DESC limit :limit") Collection<AdminUserLoginAttempt> findByUserIdOrderByIdDesc(String userId, int limit); }
public interface UserRepository extends JpaRepository<User, Long> { User findByName(String name); }

2.2.3 Test Isolation with

@SpringBootTest @Sql(scripts = "classpath:setup_for_login_attempt.sql", executionPhase = Sql.ExecutionPhase.BEFORE_TEST_METHOD)

2.3 Adapter로 테스트 성공시키기

  • Fake에 대신 Real Implementation(Adapter)를 사용해도 테스트가 정상적으로 동작한다.

맺음말

새로운 기능을 추가하는 2가지 경우

  1. 새로운 코드를 추가해야 하는 경우

  2. 기존 코드에 새로운 기능을 추가해야 하는 경우 각각의 경우 나는 서로 다른 전략을 취한다

  • 1번의 경우

    • 테스트 코드에 구현을 하고 모델 코드로 추출하는 방식을 취한다.

    • 이 경우 모델 코드의 모든 코드는 항상 100% 테스트된다는 장점이 있다.

    • 또 늘 실행 가능한 테스트가 있어서 아주 짧은 주기로 피드백을 받아 볼 수 있다.

    • 이 접근법에서는 구현이 완료된 후 적절한 기준을 통해 메소드를 분리하고, 클래스, 패키지를 분리하는 리팩터링이 중요하다.

    • 이 부분이 수반되지 않으면 바로 BBoM(Big Ball of Mud), God Class, Monster Method 등을 경험하게 된다.

  • 2번의 경우

    • 어떻게 호출될지를 알기 어렵기 때문에 무조건 새로운 기능을 구현하는 접근법은 적합하지 않다.

    • 기존 코드에서 새로운 기능을 어떻게 호출하게 될지 " 감을 잡아보는 것 "이 필요하다.

    • 새로운 기능이 존재한다고 가정하고 기존 코드에서 새로운 기능을 호출하는 코드를 추가해 본다.

    • 컴파일이 되지 않더라도 코드를 추가해서 새로운 코드를 호출해보면 감을 잡을 수 있다. 감을 잡았으면 추가한 코드를 커멘트 처리하자.

    • 그리고 커멘트 처리된 모습을 향해서 구현해 가자.

테스트 리스트의 중요성

  • Kent Beck은 항상 테스트 리스트를 작성하고 TDD를 진행한다

  • 하지만 TDD Life Cycle에서는 테스트 리스트를 작성하는 단계가 없다

  • 아마 너무도 당연한 단계라서 Life Cycle에 추가하지 않은 것 같다

  • 테스트 리스트는 다음과 같은 의미를 갖는다

    • 인수 조건 즉 종료 조건을 명시한다. 테스트 리스트가 모두 완료되면 해당 기능의 구현은 완료된 것이다.

    • 진도를 알 수 있다. 총 몇 개의 테스트 리스트에서 몇 개가 완료되었는지를 통해 진척 정도를 알 수 있다.

    • 테스트를 리스트를 잘 작성하면 구현이 좋아진다

    • Degenerate Test부터 시작해서 본질적인 테스트로 테스트 추가를 진행하면 모델(Production) 코드가 좋은 설계를 갖게 된다.

Port 인터페이스 발견과 메모리 기반 Fake의 가치

  • 속도 저하

    • 처음부터 JPA 매핑을 하고, JPA Repository를 사용해서 개발을 하면 DB를 사용하게 되어 실행 속도가 느려진다.

    • 또 JPA 관련 개발을 빈번하게 해야 해서 개발 속도가 느려진다.

  • Outside에서 in으로 들어가면 Port 인터페이스를 발견하고, 발견이 완료되면 AtomicLong, Map 등을 이용해서 Fake를 구현하면 쉽고 빠르게 테스트를 통과 시킬 수 있다.

  • 또한 JPA Repository를 application/domain service에서 직접사용하게 되면 의존성이 복잡해져서 테스트가 어려워지는 경향이 있는데, 주묘한 행위에 대해서 가급적 하나의 Port를 사용하면 의존성 관리에도 많은 도움이 된다.

  • 모든 것이 완료되었을 때 Fake 구현체를 보고 실제 DB를 사용하는 Adapter를 구현하는 것이 빠르고 쉽게 진행할 수 있다.

Last modified: 14 January 2025